How to Build the Hyper Dimensional Resonator? (With photos and schematics/plans)

jojook

New Member
Messages
10
Here is a pic with just 1 layer. Just change direction during winding 6 more times.

Simple_electromagnet2.gif

thank you Einstein, so this is 7 layer coil , each layer need separator silicon tape ?
 
Last edited:

Einstein

Temporal Engineer
Messages
5,413
Here is a pic with just 1 layer. Just change direction during winding 6 more times.

Simple_electromagnet2.gif

thank you Einstein, so this is 7 layer coil , each layer need separator silicon tape ?


This would be a coil that represents a coil with just one layer. But if you are using enamel covered magnet wire, no insulation between layers is needed. Just use the silicone tape after you are done winding the whole coil. The silicone tape is there as an additional layer of protection from the AC line current.
 

jojook

New Member
Messages
10
Here is a pic with just 1 layer. Just change direction during winding 6 more times.

Simple_electromagnet2.gif

thank you Einstein, so this is 7 layer coil , each layer need separator silicon tape ?


This would be a coil that represents a coil with just one layer. But if you are using enamel covered magnet wire, no insulation between layers is needed. Just use the silicone tape after you are done winding the whole coil. The silicone tape is there as an additional layer of protection from the AC line current.

i am very new to winding coil. thank you Einstein, one more what is called bifilar ( tesla bifilar) ? the coild under rubbing plate , any clue how to make it ?
 

Einstein

Temporal Engineer
Messages
5,413
A bifilar coil is just a coil with two parallel wires wound together.

Steven Gibbs makes his bifilar coil a little bit differently. Take some 21 AWG magnet wire, maybe 20 feet, I don't exactly remember how much. Fold it in half. Secure the open ends of wire in a vise. Take a pencil and insert it into where you folded the wire in half. Now just start to twist the wire until you have a nice even twist about every 1/4 inch or so. Then remove the pencil and on a flat surface start to wind the twisted wires into a flat pancake coil. The finished pancake coil should be about 7.8 cm in diameter.

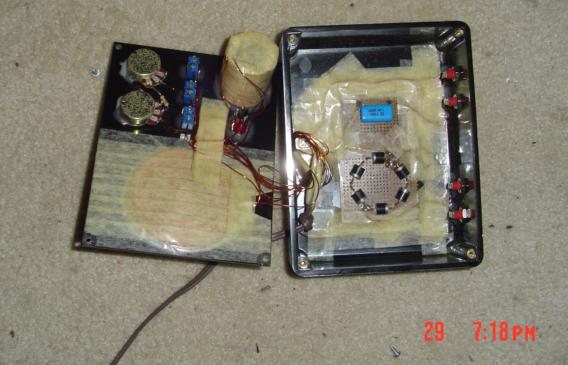
Here is how Steven installed this coil to the place called the rubbing plate area.

hdr_inside.jpg


I made mine slightly different. I don't like to use tape to hold things together. So I encased my coil in resin, and attached it to the rubbing plate area with epoxy glue.

100_0471.jpg
 

Einstein

Temporal Engineer
Messages
5,413
Probably around 100$. I remember I got the magnet wire off eBay for around 30$. It's gone up since then. I got the same black box that Steven Gibbs uses from DigiKey for 25$. Mostly everything inside was from Radio Shack. I was picky and got some guitar knobs off eBay for 6$. The power cord was a 6 foot extension cord from the hardware store for 2$. I just cut off the receptacle end and discarded that. I had to get the 1 inch steel bar for the magnet from a metal supplier. I had some 3/4 bar for the T-handle on the magnet. The witness well is just a 35 mm film canister.
 

E.Fermi.

Time Tinkerer
Zenith
Messages
36
Einstein, I like the way your caduceus coils looks embedded in the resin, do you feel that it is loosing any of it's sensitivity due to the thickness of the epoxy resin or would that have any effect at all.?
 

Einstein

Temporal Engineer
Messages
5,413
Einstein, I like the way your caduceus coils looks embedded in the resin, do you feel that it is loosing any of it's sensitivity due to the thickness of the epoxy resin or would that have any effect at all.?

I do experience the claimed dragging effect that is supposed to be felt during tuning. So I would have to answer your question as NO.

I did use the same box that Steven Gibbs uses. It feels like it is made from Bakelite. Epoxy resin is very similar to Bakelite. It does take much more time to make the Caduceus this way. I had a specially constructed pancake coil jig that I made to make pancake coils.

100_0242.jpg


The big problem in making a pancake coil is that it wont stay as a pancake after you make it, unless you solidify it somehow. In the picture after making the coil with this jig, I applied epoxy glue to the coil in the open slit sections of the jig. After the glue sets, then I was able to remove the coil without uncoiling it. Then I just dropped the coil into a suitable mold and poured epoxy resin over the whole assembly. This took me a whole day to make the coil this way.
 

Top