TEC
🤖 Time Enforcement Commission
Note: Here is a potential method to change the space-time continuum. We don't make responsible for the bad use of this information. The effects of this device, if it's not used correctly, could be EXTREMELY DANGEROUS!
Gravitational resonance:
How could the gravity be resonant? That's a good question. Like Thomas Townsend Brown said, electricity is directly engaged with gravity. Is a vectorial relationship (law of opposites), and since there is an electromagnetic vector (2 dimensions) and a gravitational vector that is at 90 degrees of both. The gravitational vector is like the "duration in time" of the electric and electromagnetic vectors. Also, they have a relationship with electric and magnetic scalar waves.
Control of reality:
How could we resonate with them to control reality? This has been proved. A good example of this is the Biefield-Brown effect, where gravity can be nullified and also reverted and converted into an electric charge. In the Philadelphia experiment, they used a magnetic neutralizer that worked like a vectorial gravity resonator.
The actual theory is that since electricity can be "transmitted" through the ether through electric scalar and vector waves, and magnetic energy through magnetic scalar and vector waves, why not gravitational scalar and vector waves if they do exist (law of opposites)? A gravity wave is the temporal "shape" of the electric and magnetic vector (I hope this is a good explanation!), and by changing this shape you are changing the molecular construction of the matter (or lack thereof) transmitting the waves.
Also, since there are an infinite number of parallel, real universes the gravity vector coil MAY allow the psychic (scalar electromagnetic brain wave) postulation of reality through the G-vector. This could also be done with a computer, but both are beyond the scope of this paper. I will now present the plans for the construction of a simple G-vector coil.
What you do with it from here is up to you, show it to your physics teachers and have them look up the references and watch their eyes pop as they find out the speed of light is NOT constant.
This, actually, is the hardest part. You will either have to spend a lot of cash at a plastics company or have some good friends to get but one of the parts needed, the others should be fairly easy.
Listed in order of availability:
(2) 50 VDC (DC-10 MHZ preferred, but...) @ 10A, 50KV isolated power supplies
(parts list for those
(2) 110 VAC to 48 VDC @ 10A Isolated step-down transformers (500 watts)
(2) 100V PIV rectifier diode
Optional (2) Heatsinks for above
(2) 0-120 VAC @ 10A variacs (variable autotransformer)
(2) 80-100V @ 1000uF electrolytic capacitors
Optional (1 or 2) Case to hold it all in
(1) 25-100 KVDC (again, DC-10 MHZ preferred...) @ 100-400 uA (not necessarily variable) 50 kV isolated power supply
(parts list)
(1) 10-12 KV @ 20-30 mA neon sign transformer
(4) TV HV diodes - 12-14 KV PIV
(4) HV capacitors, 500-1000 pF @ 10 KV
(1) 0-120 VAC @ 10A variac (variable autotransformer)
(1) Case to put it all in about 7500 feet of #16 Guage heavy Formvar magnet wire
a lot (probably 5000 feet) of #20 or #22 magnet wire
some fiberglass tape
some plastic tape
TV HV corona dope
And, the clincher:
(1) Hollow plastic dia., about 30"-32" outside diameter, 24-26" inner diameter, and about 4"-6" thick. It must be hollow, thermosetting plastic, with supports for an internal coil of wire, and two holes for the wire to leave, spaced to avoid electrical discharges. It must be boiling wax-tight, preferably with a gasket. And it should be openable, at least into 4 sections, with screw holes (and gaskets if available.) You also need enough equal portions of Carnubura (sp) beeswax, and paraffin wax to fill the inside.
Construction:
(1) Wind a 28" (about, must center inside the hollow part of the plastic donut) "hoop" coil of the #16 magnet wire. (see Illustration 1)
(2) Wrap first with fiberglass and then plastic tape, and then dip it in TV HV corona dope. Allow to dry.
(3) Place the coil inside the hollow donut.
(4) Seal the donut, allowing an opening for the wax to be poured into.
(5) Pour the wax into the donut, leaving as little air space as possible.
(6) Seal the donut, adding any extra wax.
(7) Wrap approximately one layer of the #20 or #22 gauge magnet wire over the outside of the donut.
(8) Coat with HV corona dope.
(9) You are finished with the coil. It should look similar to illustration 2.
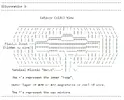
See illustration 3 for a cutaway view.
Illustration 1 in ASCII format
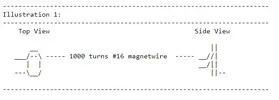
Illustration 2 in ASCII format
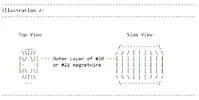
Illustration 3 in ASCII format
Building the power supplies:
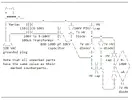
If you are unfamiliar with electronics, you may need some help with this section, as I am only presenting the schematics. Here they are:
For both 50VDC power supplies
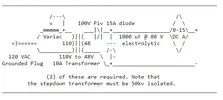
For the 100 KVDC power supply
Usage:
To connect the power supplies to the coil, connect the wires leading out of the donut (from the inner coil) to one 50 VDC power supply. The polarity, at this stage, does not matter. Next, connect the leads from the outer coil to the other 50 VDC power supply. Do NOT turn either of them on! Now, connect one of the leads of the inner coil to one terminal of the 25-100 KV power supply, and connect one lead of the outer coil to the other terminal of the 25-100 KV power supply. Thats it!
Now, the hard part. You will have to figure out some way of modulating the fields. This could be done through stepper motor control of the variac, or through the insertion of a probe coil (probably just a ferrite rod wrapped with a few hundred turns of wire) into the center of the donut hole.
This would then be modulated with whatever electromagnetic signal you'd want to impress upon the field. Through careful experimentation, you should be able to produce some very interesting effects, such as extreme gravity, bending of metal within the field, a spontaneous materialization. etc. Note that the purpose of the wax is to act as a molten dielectric, so don't be surprised when it starts boiling. That's why the donut form must be made out of thermosetting (or any kind that doesn't melt near the temperature of boiling wax) plastic. Have fun, and don't do anything you wouldn't want perpetuated throughout your subjective reality!
There are two modifications to the above device which should make the effect of the unit more powerful, while at the same time making it more safe for the operator to conduct his/her research.
1. In place of the wax in the coil being used as a "molten dielectric", it would be advantageous to use Glycerine instead. The "scorch field" set up between the two coils using the 25-100kvdc supply will be approx. 25 times greater in intensity than with the wax. While the dielectric constant (k) of wax is less than 3, the (k) of Glycerine is about 56. Also, the semi-liquid state that Glycerine maintains at room temperature will prove to be an effective heat sink for the inner coil. Glycerine is an emollient and can be obtained from most drug stores.
2. The Modulator coil (250-300 turns) on the ferrite core to be placed into the interior of the coil shall be replaced by a coil larger in diameter than the outer coil of the present unit (as herein described) and shall be placed outside the units' outer coil. This will give a more stable field configuration while confining the gravitational effects to the interior of the device.
These two modifications, while increasing the units' power, will also provide a level of safety not to be had in the original design.
A word of caution!!!
While operating this device, it would be wise to secure a non-interruptable power supply for it. If, while the fields were at their maximum output, the power to the coils were to be suddenly interrupted, a very serious condition could arise as the distorted region of spacetime surrounding the coil "cut loose" into the surrounding spacetime beyond the coils' influence. A "pulse" of distorted spacetime might, under these conditions, leave the coil at high velocity, and inflict great damage to the surroundings near the coil. (Including the operator)
Gravitational resonance:
How could the gravity be resonant? That's a good question. Like Thomas Townsend Brown said, electricity is directly engaged with gravity. Is a vectorial relationship (law of opposites), and since there is an electromagnetic vector (2 dimensions) and a gravitational vector that is at 90 degrees of both. The gravitational vector is like the "duration in time" of the electric and electromagnetic vectors. Also, they have a relationship with electric and magnetic scalar waves.
Control of reality:
How could we resonate with them to control reality? This has been proved. A good example of this is the Biefield-Brown effect, where gravity can be nullified and also reverted and converted into an electric charge. In the Philadelphia experiment, they used a magnetic neutralizer that worked like a vectorial gravity resonator.
The actual theory is that since electricity can be "transmitted" through the ether through electric scalar and vector waves, and magnetic energy through magnetic scalar and vector waves, why not gravitational scalar and vector waves if they do exist (law of opposites)? A gravity wave is the temporal "shape" of the electric and magnetic vector (I hope this is a good explanation!), and by changing this shape you are changing the molecular construction of the matter (or lack thereof) transmitting the waves.
Also, since there are an infinite number of parallel, real universes the gravity vector coil MAY allow the psychic (scalar electromagnetic brain wave) postulation of reality through the G-vector. This could also be done with a computer, but both are beyond the scope of this paper. I will now present the plans for the construction of a simple G-vector coil.
What you do with it from here is up to you, show it to your physics teachers and have them look up the references and watch their eyes pop as they find out the speed of light is NOT constant.
This, actually, is the hardest part. You will either have to spend a lot of cash at a plastics company or have some good friends to get but one of the parts needed, the others should be fairly easy.
Listed in order of availability:
(2) 50 VDC (DC-10 MHZ preferred, but...) @ 10A, 50KV isolated power supplies
(parts list for those
(2) 110 VAC to 48 VDC @ 10A Isolated step-down transformers (500 watts)
(2) 100V PIV rectifier diode
Optional (2) Heatsinks for above
(2) 0-120 VAC @ 10A variacs (variable autotransformer)
(2) 80-100V @ 1000uF electrolytic capacitors
Optional (1 or 2) Case to hold it all in
(1) 25-100 KVDC (again, DC-10 MHZ preferred...) @ 100-400 uA (not necessarily variable) 50 kV isolated power supply
(parts list)
(1) 10-12 KV @ 20-30 mA neon sign transformer
(4) TV HV diodes - 12-14 KV PIV
(4) HV capacitors, 500-1000 pF @ 10 KV
(1) 0-120 VAC @ 10A variac (variable autotransformer)
(1) Case to put it all in about 7500 feet of #16 Guage heavy Formvar magnet wire
a lot (probably 5000 feet) of #20 or #22 magnet wire
some fiberglass tape
some plastic tape
TV HV corona dope
And, the clincher:
(1) Hollow plastic dia., about 30"-32" outside diameter, 24-26" inner diameter, and about 4"-6" thick. It must be hollow, thermosetting plastic, with supports for an internal coil of wire, and two holes for the wire to leave, spaced to avoid electrical discharges. It must be boiling wax-tight, preferably with a gasket. And it should be openable, at least into 4 sections, with screw holes (and gaskets if available.) You also need enough equal portions of Carnubura (sp) beeswax, and paraffin wax to fill the inside.
Construction:
(1) Wind a 28" (about, must center inside the hollow part of the plastic donut) "hoop" coil of the #16 magnet wire. (see Illustration 1)
(2) Wrap first with fiberglass and then plastic tape, and then dip it in TV HV corona dope. Allow to dry.
(3) Place the coil inside the hollow donut.
(4) Seal the donut, allowing an opening for the wax to be poured into.
(5) Pour the wax into the donut, leaving as little air space as possible.
(6) Seal the donut, adding any extra wax.
(7) Wrap approximately one layer of the #20 or #22 gauge magnet wire over the outside of the donut.
(8) Coat with HV corona dope.
(9) You are finished with the coil. It should look similar to illustration 2.
See illustration 3 for a cutaway view.
Illustration 1 in ASCII format

Illustration 2 in ASCII format

Illustration 3 in ASCII format

Building the power supplies:
If you are unfamiliar with electronics, you may need some help with this section, as I am only presenting the schematics. Here they are:
For both 50VDC power supplies

For the 100 KVDC power supply

Usage:
To connect the power supplies to the coil, connect the wires leading out of the donut (from the inner coil) to one 50 VDC power supply. The polarity, at this stage, does not matter. Next, connect the leads from the outer coil to the other 50 VDC power supply. Do NOT turn either of them on! Now, connect one of the leads of the inner coil to one terminal of the 25-100 KV power supply, and connect one lead of the outer coil to the other terminal of the 25-100 KV power supply. Thats it!
Now, the hard part. You will have to figure out some way of modulating the fields. This could be done through stepper motor control of the variac, or through the insertion of a probe coil (probably just a ferrite rod wrapped with a few hundred turns of wire) into the center of the donut hole.
This would then be modulated with whatever electromagnetic signal you'd want to impress upon the field. Through careful experimentation, you should be able to produce some very interesting effects, such as extreme gravity, bending of metal within the field, a spontaneous materialization. etc. Note that the purpose of the wax is to act as a molten dielectric, so don't be surprised when it starts boiling. That's why the donut form must be made out of thermosetting (or any kind that doesn't melt near the temperature of boiling wax) plastic. Have fun, and don't do anything you wouldn't want perpetuated throughout your subjective reality!
There are two modifications to the above device which should make the effect of the unit more powerful, while at the same time making it more safe for the operator to conduct his/her research.
1. In place of the wax in the coil being used as a "molten dielectric", it would be advantageous to use Glycerine instead. The "scorch field" set up between the two coils using the 25-100kvdc supply will be approx. 25 times greater in intensity than with the wax. While the dielectric constant (k) of wax is less than 3, the (k) of Glycerine is about 56. Also, the semi-liquid state that Glycerine maintains at room temperature will prove to be an effective heat sink for the inner coil. Glycerine is an emollient and can be obtained from most drug stores.
2. The Modulator coil (250-300 turns) on the ferrite core to be placed into the interior of the coil shall be replaced by a coil larger in diameter than the outer coil of the present unit (as herein described) and shall be placed outside the units' outer coil. This will give a more stable field configuration while confining the gravitational effects to the interior of the device.
These two modifications, while increasing the units' power, will also provide a level of safety not to be had in the original design.
A word of caution!!!
While operating this device, it would be wise to secure a non-interruptable power supply for it. If, while the fields were at their maximum output, the power to the coils were to be suddenly interrupted, a very serious condition could arise as the distorted region of spacetime surrounding the coil "cut loose" into the surrounding spacetime beyond the coils' influence. A "pulse" of distorted spacetime might, under these conditions, leave the coil at high velocity, and inflict great damage to the surroundings near the coil. (Including the operator)
